After a couple of simple VS Code and Theia based demo applications, I officially published my first productive extension recently. ODX Commander is a simple editor and navigator for large diagnostic data sets in Open Diagnostics eXchange format. The tool hopefully helps the one or the other person working in the automotive industry to survive the working day.
After upgrading all Theia dependencies to version 1.5 the URDF extension unfortunately no longer worked as expected. After a little research I stumbled about this inconspicuous information in the 1.4 release notes:
@theia/languages extension is deprecated, use VS Code extensions to provide language smartness
To avoid finding myself in a technical dead end again, I decided to rewrite the designer as a pure Visual Studio Code extension instead. As you might already know, Theia was designed to run VS Code extensions from the beginning. Amongst other things, implementing VS Code extensions provides the following benefits:
Better documentation and developer experience
VS Code extensions can be used both in Theia and VS Code
On this occasion I also dropped the heavyweight XText and Spring based LSP server gadgetry. This keeps things more simple and using just declarative language features might be adequate for most scenarios.
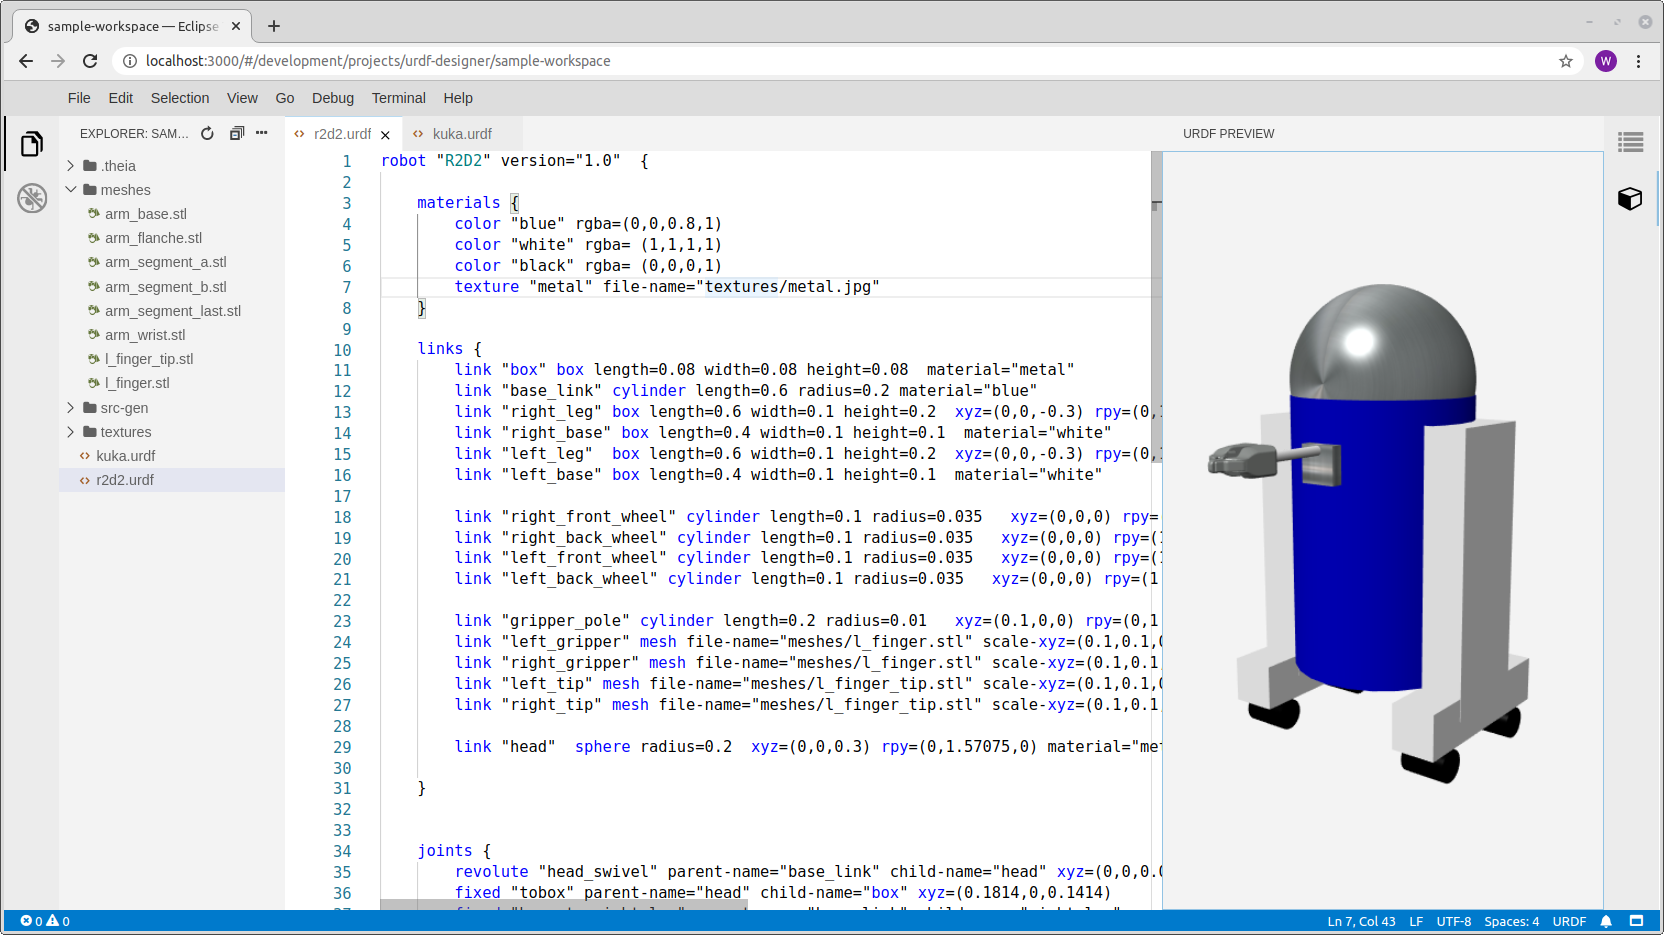
Thanks to the excellent documentation, rewriting the extension was fun and relatively straightforward. Only bringing the Babylon.js based renderer into a Webview was a little bit fiddly. Below you see the final result installed in Visual Studio Code.
VS Code Integration
I published the code together with a sample workspace comprising two simple robots on Github. Checkout the workspace and install the released extension if you wanna see it in action. However before doing that, better read about the Gitpod integration first!
After I have rewritten the URDF application in Visual Studio Code, I wanted to bring it back into Theia. According to this comparison, Theia roughly estimated implements 90% of VS Code’s public API.
In theory using the released Visual Studio Code extension in Theia is as simple as adding a single line in the package.json:
However in practice I had some minor issues with unsupported API, URI.joinPath(), Extension.extensionUri(), ExtensionContext.extensionUri() just to name a few, that I could work around using already supported API.
After that unproblematic modifications, now the plugin runs in Theia again. I still have some problems with context sensitive buttons and rearranging the preview window behaves slightly different. Anyway good enough for the moment and as you can see below, both applications look almost identical.
Theia Integration
Whilst the period in which I have implemented this demo, the first version of Gitpod was released. This blog post perfectly describes what Gitpod exactly is:
Gitpod is an online IDE which can be launched from any GitHub page. Simply prefix any GitHub-URL with “https://gitpod.io#” or use out browser extension that adds a button to GitHub pages.
It turned out that Gitpod (right now) only supports VS Code compatible extensions. To be honest, another reason for me to rewrite the extension again.
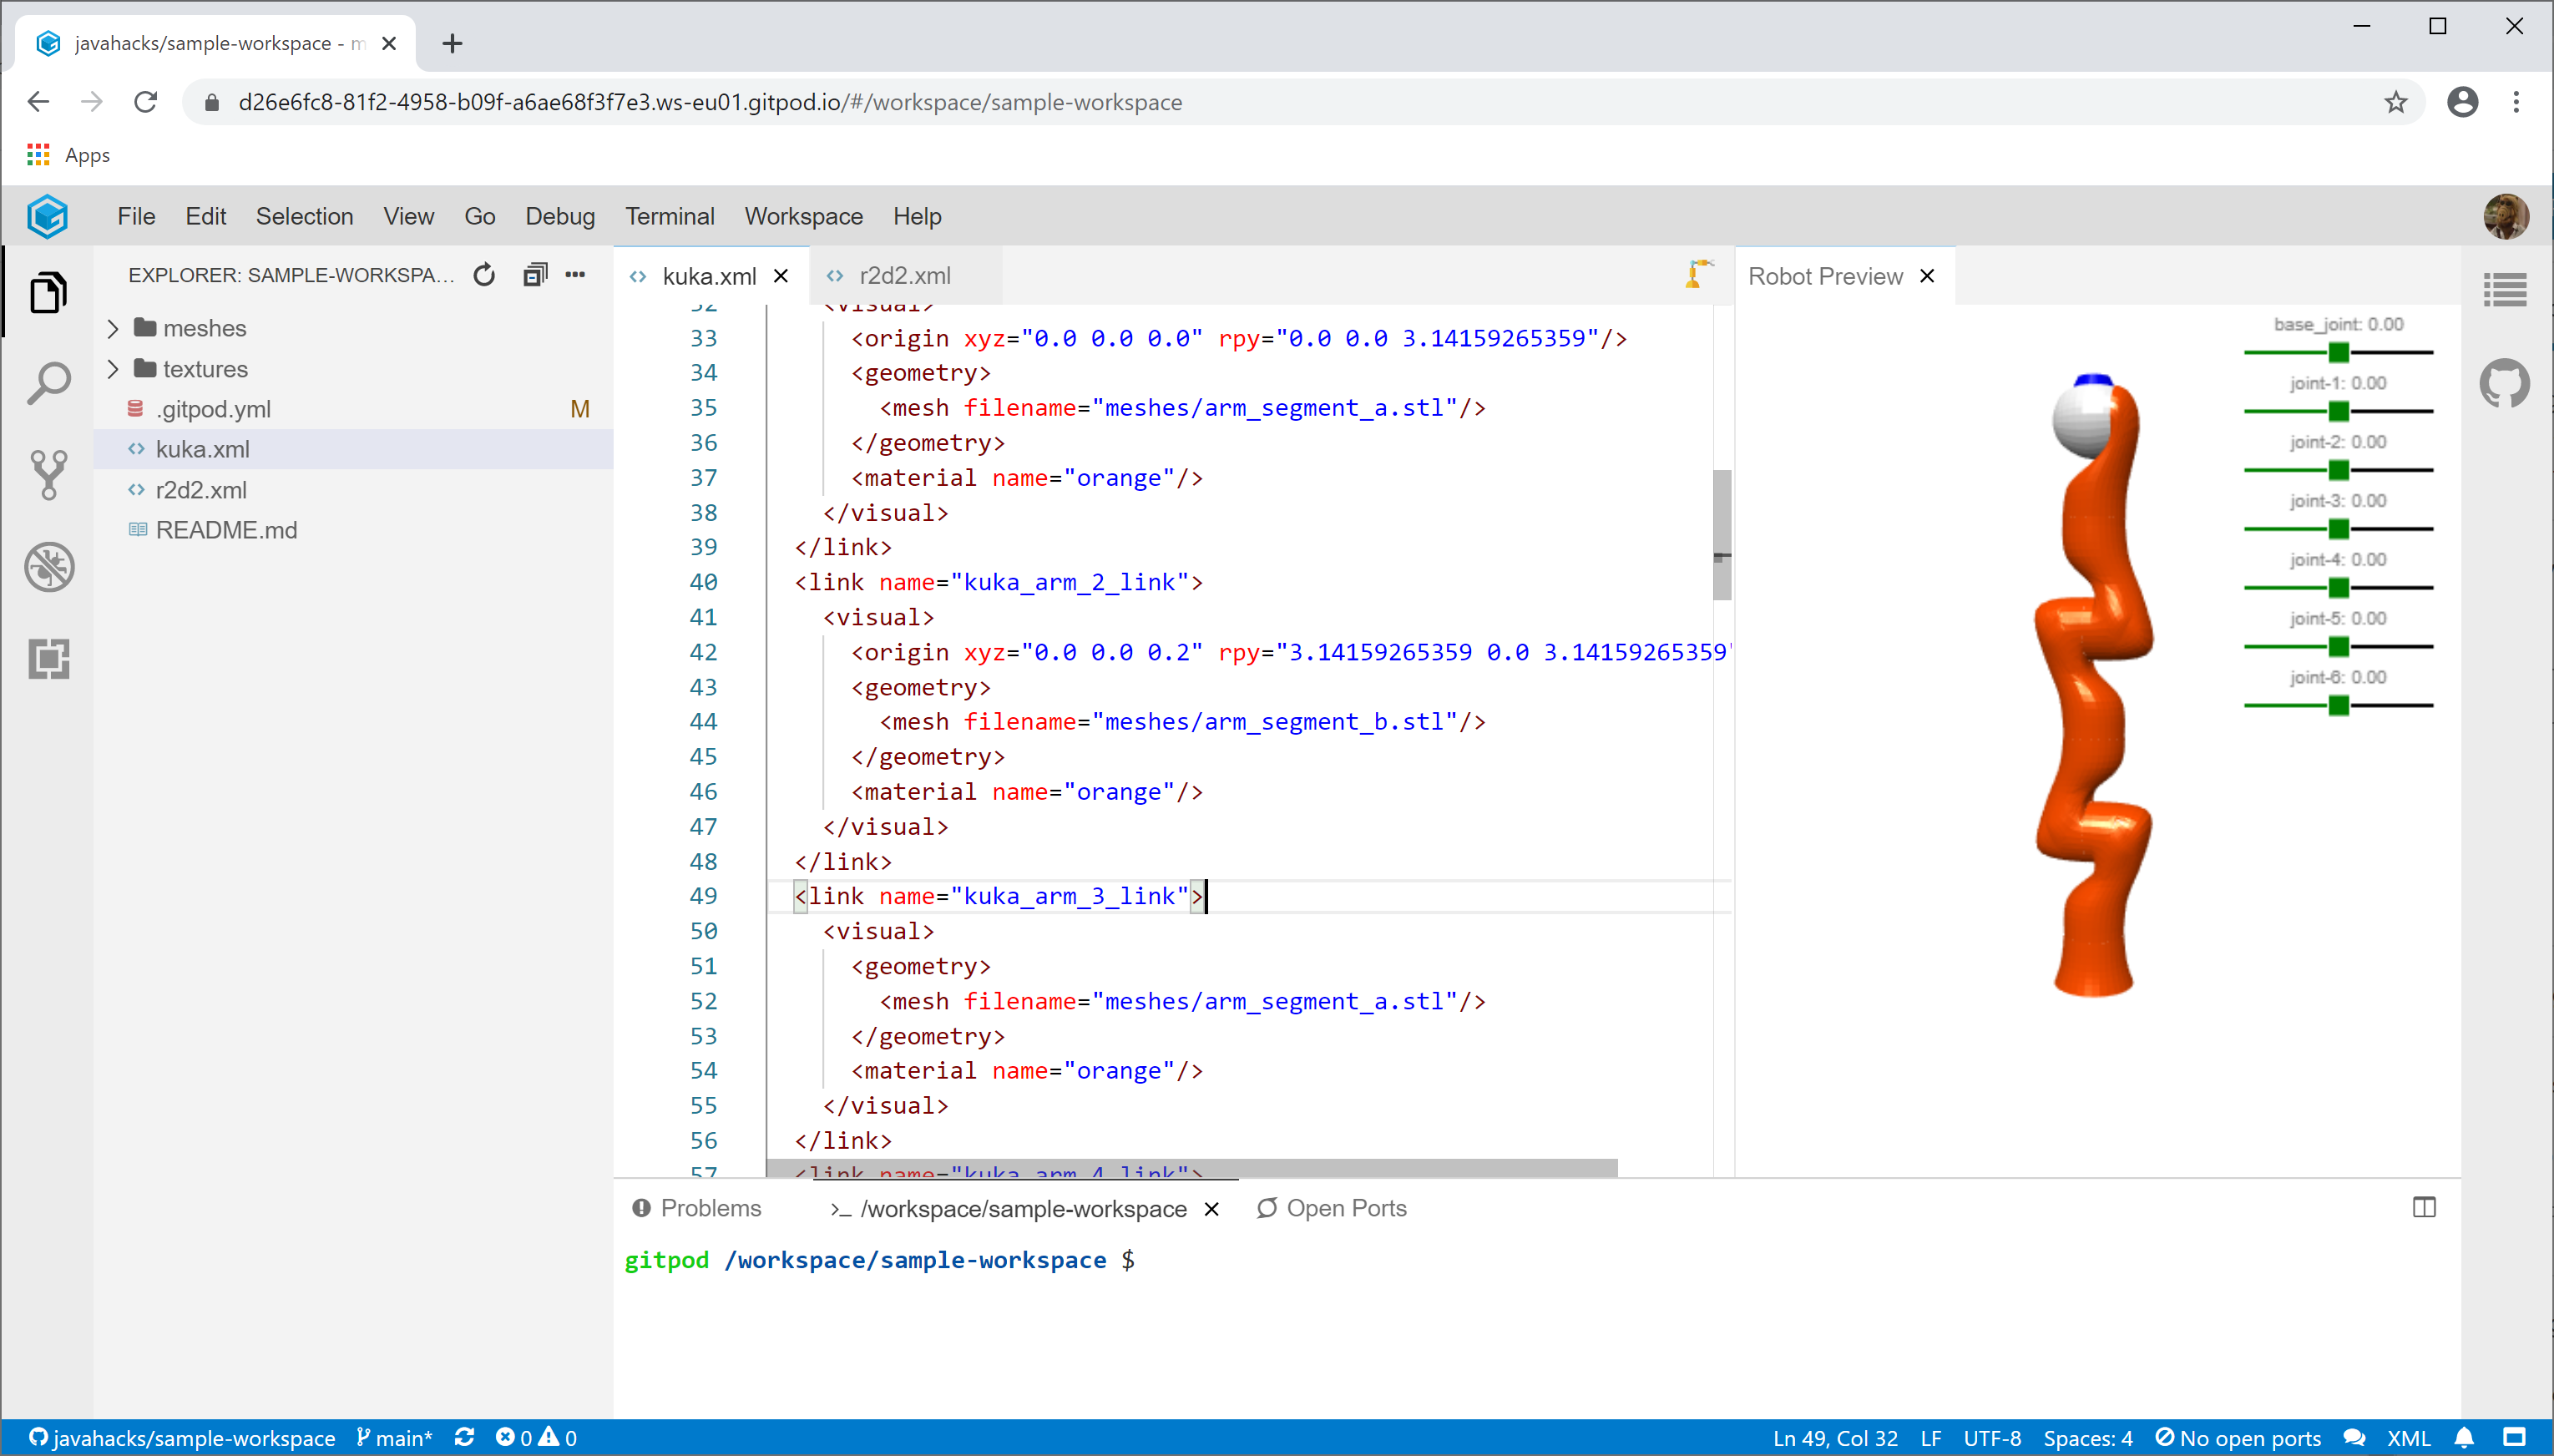
Since Gitpod’s integrated IDE is based on Theia, all Visual Studio Code extensions running in Theia can be reused in Gitpod too. The installation is amazingly simple. The image below shows the extension running in Gitpod. If you have a valid Github account, just follow this link to see it online.
Gitpod Integration
Conclusion
What have I learned so far? Theia’s proprietary extension API is challenging and nothing I’d recommend to start with. The documentation is minimalistic and the API might still change over time as happened when dropping @theia/languages.
So better start implementing your application by writing Visual Studio Code extensions. I guess Theia is supposed to implement the entire VS Code API in the long term. In the short term, try to avoid latest VS Code features and check Theia for compatibility every now and then. Theia in combination with Gitpod is great and you should definitely give it a try. Hopefully the team can keep up the pace with Microsoft’s monthly release cycle. If not, or the project is stopped one day, you can still use VS Code or VSCodium instead!
During the past few weeks I implemented a couple of smaller improvements for the URDF designer application. As already mentioned, this application was never intended to be used in production. It’s a showcase project and my personal playground for learning more about cloud based IDEs using Theia and Eclipse Che.
Controls for revolute and continuous joints
Simply rendering robot links wasn’t satisfying enough and I added slider controls for all ‘revolute’ and ‘continuous’ joints in the preview control.
Improving the default outline provider
I didn’t like the hierarchical outline view presentation that is provided for LSP editors in Theia by default. I thought it’s clearer to flatten the details tree and give each model element a unique icon. Unfortunately it turned out that adjusting the outline view is not trivial and the only way to achieve this is overriding and rebinding the default outline contribution. In addition to that, I also had to modify the qualified name provider to push some extra type information to the frontend.
Synchronizing texteditor and preview widget
Theia comes with a global selection service that allows the delivery of arbitrary selection events. There are already a couple of interesting built-in events, selecting a file in the navigator raises a file selection event for instance.
After I had overridden the standard MonacoOutlineContribution, I gathered enough knowledge how to track the currently selected link in URDF text editors. Whenever the textual description of a robot link is selected, a LinkSelection event is distributed by the global selection service.
An exemplary consumer of fired LinkSelection events is the preview control that highlights selected links accordingly.
That’s all! I hope you like the new features and maybe the linked sources will help you with your own projects too.
Modern robotics is surely one of today’s most interesting topics you can be engaged in. However I’m not a robotics engineer and this post is not about building robots. It’s more about the sometimes underestimated problem of providing engineering teams with sophisticated tools that help to get their job done. The last 15 years I worked in many tooling related projects in the medical, automotive and aerospace industry. Eclipse’s mature rich client platform together with all its side projects like Xtext always was a solid basis to start with.
Otherwise IT rapidly moves forward and many cloud based applications impressively show what can be achieved with nowadays web technologies. A relatively new application framework that simplifies writing web based applications is Eclipse Theia. For more information about Theia please visit the website or read the excellent blog posts here.
Instead of programming the obligatory ‘Hello World‘ command button application, I decided to step a little bit further and implemented the prototype of an URDF model designer. URDF is a simple XML format used to describe the visual aspects, kinematics and physics of rigid body robots. URDF is part of the open source robotics operating system ROS and is understood by the 3D simulation tool RVIZ.
Robots are defined in a simplified domain specific language from which appropriate XML files are generated automatically. A WebGl renderer displays the currently edited robot in a small window. The application was never intended to be used in production and covers only the visual elements of URDF. Anyway it was a challenging fun project and helped me to learn more about Theia’s core concepts.
The illustration below shows the overall application architecture. The source code together with a sample workspace is available on github.
The application basically consists of two components:
A Spring Boot based server that comprises the language server and URDF endpoints
A single Theia extension that provides language support and the preview control
As a Java developer I wanted to leverage and reuse my existing knowledge in server side programming. That’s why I used Xtext to create the URDF language server and Spring Boot to implement the business logic and endpoints.
To avoid CORS problems and for simplicity reasons, the UI sends all requests to a single Theia backend. The HTTP-Proxy component forwards all requests under a certain domain to the Java backend. Communication between LSP server implementation and LSP server contribution is achieved using web-sockets. If you are interested in HTTP proxy forwarding and LSP web-socket connection, both are implemented in this class.
Here you can see the final application showing URDF models for a KUKA LWR robot in action.
To be honest I’m not ready to give a serious final conclusion yet. What I can say so far is that Theia is definitely an interesting framework with a huge potential. As a next step I plan getting my feet wet with Eclipse Che to make my little URDF designer a real cloud based multiuser application. Hopefully afterwards I gained enough Theia programming experience to hand the final statement later.
In my past customer project we designed an RCP application that was supposed to monitor and manage a distributed flight simulation. The simulation consists of dozens of independent simulation nodes that interchange messages and signals over a local network.
Basically the RCP application manages a huge and dynamic model graph that reflects all relevant information of the underlying flight simulation. All that information is displayed simultaneously in multiple views and editors.
The domain model is based on EMF and comprises about 100 classes with hundreds of thousands of runtime instances. The application continuously receives network messages on multiple background jobs and updates parts of the domain model accordingly.
Since a flight simulation is a highly dynamic system with dozens of model updates per second, we stumbled upon two major problems:
EMF models are not thread-safe by default and writing multithreaded applications is not that simple. The more complex our application became, the more often we got concurrent modification exceptions and had problems with filtering and sorting operations.
As you can see in the table below, the only thread-safe operation on EMF instances is reading a single-valued attribute.
Single-Valued Attribute
Multi-Valued Attribute
+ Read
– Iterate
– Write
– Add/Remove
It’s not obvious that writing a single-valued attribute from multiple threads is forbidden. However attaching an EAdapter in one thread while propagating a set event in another thread fires concurrent modification exceptions as well.
There are two established solutions to avoid multithreading problems in EMF.
EMF transaction uses transactional editing domains to synchronize read and write operations on different threads. All write operations are triggered by commands that are executed on the domain’s transactional commandstack.
final TransactionalEditingDomain domain = TransactionalEditingDomain.Registry.INSTANCE.getEditingDomain("instanceName");

domain.getCommandStack().execute(AddCommand.create(...));
domain.getCommandStack().execute(RemoveCommand.create(...));
All Read operations have to run in an exclusive context and the result is passed back as follows:
In addition the framework contains several classes for EMF.edit programming.
//EMF.edit support
viever.setContentProvider(new TransactionalAdapterFactoryContentProvider(domain,af);
viever.setLabelProvider(new TransactionalAdapterFactoryLabelProvider(domain,af);
I gave up figuring out how EMF transaction actually is working behind the scenes. It’s really complex and using the framework requires a consequent usage throughout the entire application. While synchronizing write operations using commands is doable, encapsulating all read operations on a shared editing domain ends up in writing many lines of additional boilerplate code. Especially UI related code becomes quite more complex and it’s very likely that team members simply fade out synchronization when just bringing up a simple info dialog that shows parts of your domain model.
That’s why we decided to use a simpler solution.
Model synchronization on the UI Thread
According to the EMF FAQ, EMF itself does not ensure thread-safety in application model implementations. Data structures are unsynchronized, the expectation is that a complete instance of the model (including resources and resource set, if present) should only be accessed by one thread at a time.
By one thread at one time can also be realized by using always the same single thread. An excellent candidate for such a thread is the UI/Display thread.
The advantage of using this thread is that all model operations triggered from inside the UI thread ( e.g. initializing views, databinding, event handlers ) run faultless without any further synchronization. Since more than 80% of all our application code is running in the UI thread we didn’t have to think about concurrency too much.
However all applications require some long running – mostly IO intensive – background operations that affect the application’s domain model. Fortunately a solution for that is really straightforward.
Write operations in background jobs
Below is an example how to modify the domain model in a background job. By the way never use Java threads directly. Prefer higher a level abstraction like the Eclipse jobs API or executor services.
new Job("Model Update") {

   protected IStatus run(IProgressMonitor monitor) {

       //create model in long running operation
	Signal signal = fetchFromWebserviceOrWhatEver();

       //merge instance in UI thread afterwards
	Display.getDefault().syncExec(()->;model.getSignals().add(signal));

	...
After the long running operation has finished, the new model instance has to be merged immediately. Model updates are pretty short running operations and it’s no problem to run them in the UI thread. Actually this thread is idling and waiting for user input most of its time. However using the display object directly is not recommended because not all OSGI bundles should necessarily have dependencies to SWT.
That’s why we used a simple EMFTRansactionHelper utility class that provides methods to modify EMF models thread-safe. In our RCP application the class is initialized on startup as shown below. For headless unit tests running on the server, this class is initialized with another synchronizer.
new Job("Model Append") {

@Override
protected IStatus run(IProgressMonitor monitor) {

 Signal signal = ModelFactory.eINSTANCE.createSignal();
 signal.setName(UUID.randomUUID().toString());
 signal.setValue((int) Math.random());

 EMFTransactionHelper.addElementExclusive(model,ModelPackage.Literals.MODEL__SIGNALS, signal);
Read operations in background jobs
Many long running operations only need read access to the domain model. For instance generating reports or PDF documents. Unlike reading single-valued attributes from multiple threads iterating over multi-valued collections in background jobs is really problematic.
One option is cloning (EcoreUtil.copy()) parts of the application model in the UI thread and use the cloned model for background processing.
If cloning is not possible, the collection must be copied synchronized in the job itself. Here is an example:
new Job("Read Only") {

@Override
protected IStatus run(IProgressMonitor monitor) {

  //clone list thread-safe
  List<Signal> cL = EMFTransactionHelper.cloneCollectionExclusive(model.getSignals);

  //iterate over clone
  cL.forEach(s-> ...)
Demo Application
The video below shows a very simple application that demonstrates both synchronization techniques. Each viewer contains 10.000 model instances that are modified continuously. The sourcecode is available here.
As you can see, the user interface still reacts very smooth. Both solutions have their pros and cons. For our use case the second solution was the better option. For other uses cases EMF transaction might be the better choice.
Wolfgang Geck
9:40 am on June 11, 2016 Tags: Babylon.js, Cube Puzzle, WebGL
This post has nothing to do with programming in general, but since my 40th birthday is coming closer and closer I think it’s a good time to conserve some work of my childhood here.
More than 25 years ago I read an interesting book containing a chapter with blueprints of wooden cube puzzles. After building multiple puzzles by means of the pictured blueprints, I decided to design my own. Unfortunately the original version made of wood got lost over time. Since I needed a playground project to start with babylon.js I created a digital version. Here is the result:
The live version is hosted on Orionhub, source and Blender model can be found here.
The cube is not perfectly symmetrical. Anyway I think it looks pretty cool. And of course I can definitively not guarantee whether this puzzle was not already designed by someone else:) Let me know if you have seen it before, thanks!
Maybe you already stumbled upon the problem to display model instances with hundreds or even thousands of child elements in a tree based viewer. Displaying all that children as direct successors of their parent (shown in the figure on the left) is confusing and slows down the UI.
An alternative approach is to hook in virtual folders, that contain a subset of the parent’s child elements instead. This approach is shown in the figure on the right and might be familiar to you since it’s also used in the Eclipse ‘Variables’ view.
If you use EMF.Edit based item providers to display your domain objects read on!
The technique shown here is a slightly modified version of the technique explained in chapter 19.2.3 Adding Non-Model Intermediary View Objects of the standard Eclipse Modeling Framework book.
The source code below is used to display the right tree viewer in the illustration above. It’s usual EMF.Edit programming. The only difference is the usage of a PartitionedContentProvider instead of an AdapterFactoryContentProvider.
You find the implementation of PartitionedContentProviderhere. It’s packaged into a plugin but feel free to copy that single class into your own project. Overwrite the method getVirtualFolderSize() to limit the maximum number of container’s direct children. If the number exceeds this limit, virtual folders are hooked in instead. If the virtual folder size is -1 virtual folders are not created.
final AdapterFactory adapterFactory = new ComposedAdapterFactory(ComposedAdapterFactory.Descriptor.Registry.INSTANCE);
domain = new AdapterFactoryEditingDomain(adapterFactory, new BasicCommandStack());

viewer = new TreeViewer(parent, SWT.FLAT | SWT.MULTI);

viewer.addDragSupport(DND.DROP_MOVE, new Transfer[] { LocalTransfer.getInstance() }, new ViewerDragAdapter(viewer));
viewer.addDropSupport(DND.DROP_MOVE, new Transfer[] { LocalTransfer.getInstance() }, new EditingDomainViewerDropAdapter(domain, viewer));
viewer.setLabelProvider(new AdapterFactoryLabelProvider(adapterFactory));

// we limit the maximal child elements for containers to 100
viewer.setContentProvider(new PartitionedContentProvider(adapterFactory) {

       @Override
       protected int getVirtualFolderSize(Object folder) {
          return folder instanceof Container ? 100 : DEFAULT_FOLDER_SIZE;
       }
});
Don’t get me wrong I really like Maven. It’s a great and technically mature build system. Nevertheless I try to avoid it in all my RCP and OSGi projects because all that POM declarations are redundant and unnecessary in some way. Inter bundle dependencies are expressed by means of OSGi manifests and the build process provided by the Eclipse environment respectively the headless PDE build is more than adequate. Obviously this is just a matter of taste and if you use Tycho or other IDEs with the better Maven support, maybe you will not agree.
Anyway there are many existing OSGi bundles (e.g. Jetty, Vaadin, log4j, Knopflerfish) available in Maven Central and manually downloading them together with all their dependencies is a cumbersome task. Also Maven dependencies without proper OSGi metadata information can be transformed via the maven-bundle-plugin if required.
So during my experiments with the embedded XULRunner, I tried to find a mechanism that automatically adds bundles from Maven repositories to my active target platform. If you are not familiar with the concept of Eclipse target platforms read this tutorial first.
This is my best solution so far. If you have better ideas please let me know!
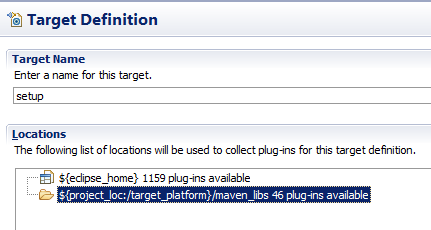
Create a simple project named target_platform in your workspace. In the new project create a sub folder named maven_libs. Later this sub folder is the location of all jar files fetched by Maven. Select New->Other->Target Definition and add the maven_libs folder to the list of required locations.
The path ${project_loc:/target_platform}/maven_libs works fine even if the target_platform project is outside the current workspace. Of course you can still add further locations like environment variables, folders or p2 repositories.
Create the following pom.xml definition that lists all required dependencies in your target platform project and configure the outputDirectory accordingly.
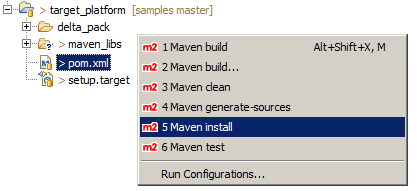
Now run mvn install from within Eclipse or on the command line inside the ‘target_platform’ location to fetch all libraries configured in the POM configuration.
Reopen the target definition and select Set as Target Platform. If you run Maven outside your IDE refresh the target platform project first.
This approach is also useful for the POM dependency resolution explained here. Now you have the same bundle resolution at the build and development time and running the Maven installation to setup the target platform on your build server (without Tycho) is no problem.
Today HTML 5 is one of the most sophisticated and popular UI technology available. Unfortunately writing business code using Javascript is a mess. If you are used to Java’s type safety, the modularity of OSGi and all that dozens of third party libraries, you know that plain Javascript is a huge step backwards. The Java Virtual Machine and HTML complement each other for many years in web based applications. So why not combine both technologies to create rich desktop applications? A platform independent user interface on top of a platform independent programming language – a perfect match!
I was very excited when I heard about the HTML 5 support in JavaFX. However the ‘Webview’ rendering is very bad and not comparable to most recent web browsers. Fortunately the browser support in SWT was improved with Eclipse Luna and embedding XULRunner 24.x is now possible.
XULRunner is the primary HTML rendering engine used by Firefox and is available on all major operating systems. The WebGL support in XULRunner is great, audio and video playback are implemented. Also the rendering result on different platforms is almost identical so you don’t have to fight with all that different browser quirks as usual in web development.
The demo below shows an SWT based application with embedded XULRunner that renders a simple WebGL scene using three.js.
The SWT browser API supports calling Java from Javascript and vice versa. I added the ‘Take Screenshot’ and ‘Add Image’ button just to demonstrate the interaction ability. The screen capture itself is based on the solution I posted a while ago . The source code for the demo is available here.
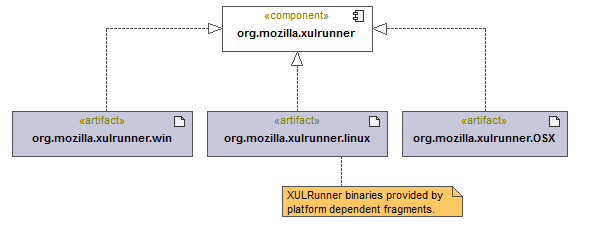
After you can not rely on a proper XULRunner installed on your user’s target machine, bundle your application together with the appropriate XULRunner version. For OSGi based applications this is really straightforward and an exemplary implementation can be found here (Sorry I couldn’t integrate the OSX version yet).
The org.mozilla.xulrunner bundle is the platform independent host bundle with helper classes to instantiate XULRunner based browsers. The XULRunner binaries are provided by platform specific fragment bundles, one fragment for each operating system characteristic.
XULRunner is not supported for GTK3 so under Linux you have to use a start script to run your application:
#!/bin/bash
export SWT_GTK3=0
./yourApp
At the moment I’m playing with different approaches to combine Java and HTML. Single page apps with Java calls using AngularJS and Bootstrap, server centric solution using Vaadin and RAP. So far I have absolutely no idea what works best but I let you know in the near future on this blog.
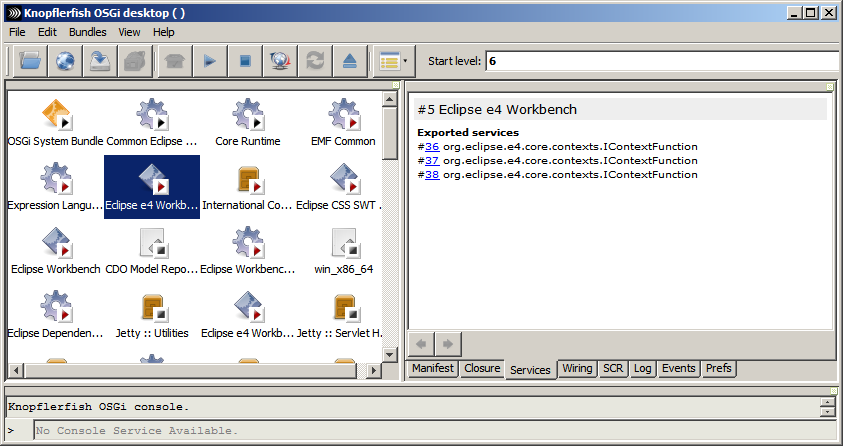
If you are familiar with OSGi development you should already know Knopflerfish an open source OSGi Service Platform. Knopflerfish is an implementation of the OSGi R5 specifications and includes a set of Knopflerfish specific bundles and utilities. An overview of the distribution’s bundles is given here.
The most noteworthy of that additional bundles is the Knopflerfish OSGi Desktop. The desktop is a GUI application that gives a graphical overview of the running OSGi instance. From within the desktop bundles can be started, stopped updated or installed. Additional bundle and service detail information is shown.
The desktop is based on two standard OSGi bundles using Swing without any further dependencies. So it can easily be integrated in Equinox based projects (e.g. RCP applications). The Maven repository and coordinates for that bundles are:


 Modern robotics is surely one of today’s most interesting topics you can be engaged in. However I’m not a robotics engineer and this post is not about building robots. It’s more about the sometimes underestimated problem of providing engineering teams with sophisticated tools that help to get their job done. The last 15 years I worked in many tooling related projects in the medical, automotive and aerospace industry. Eclipse’s mature rich client platform together with all its side projects like Xtext always was a solid basis to start with.
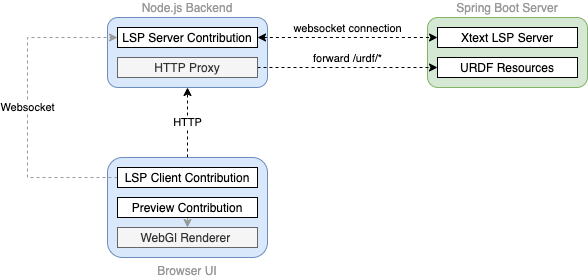
 and manage a distributed flight simulation. The simulation consists of dozens of independent simulation nodes that interchange messages and signals over a local network.
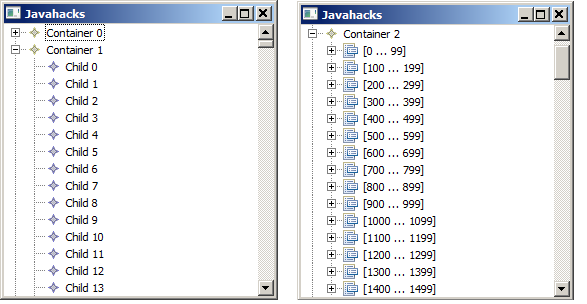

